[TUTORIAL] Procedural terrain generation

Hi,
It came to my attention that terrain generation was a hot topic at the moment in the development of Thrive, and that the developers are still considering options on how to do it.
Since I’ve been dabbling with it myself, I wanted to share some code I made for my own projects. It’s probably close to whatever is used in other games, I suppose (in games like No Man’s Sky or, for those of my generation, a very old game called Unicycle). So, nothing original here, but at least it’s homemade !
This code uses C++. Consider it an open source option and still a draft, although a functioning one. Please also note that this is an example in two dimensions. It would need further adaptation to suit a 3D environment.
First, here’s a picture. On the top left corner, this is what the planet looks like on the planet selector screen, when you launch a new game. To the right is the terrain as it is generated in-game .

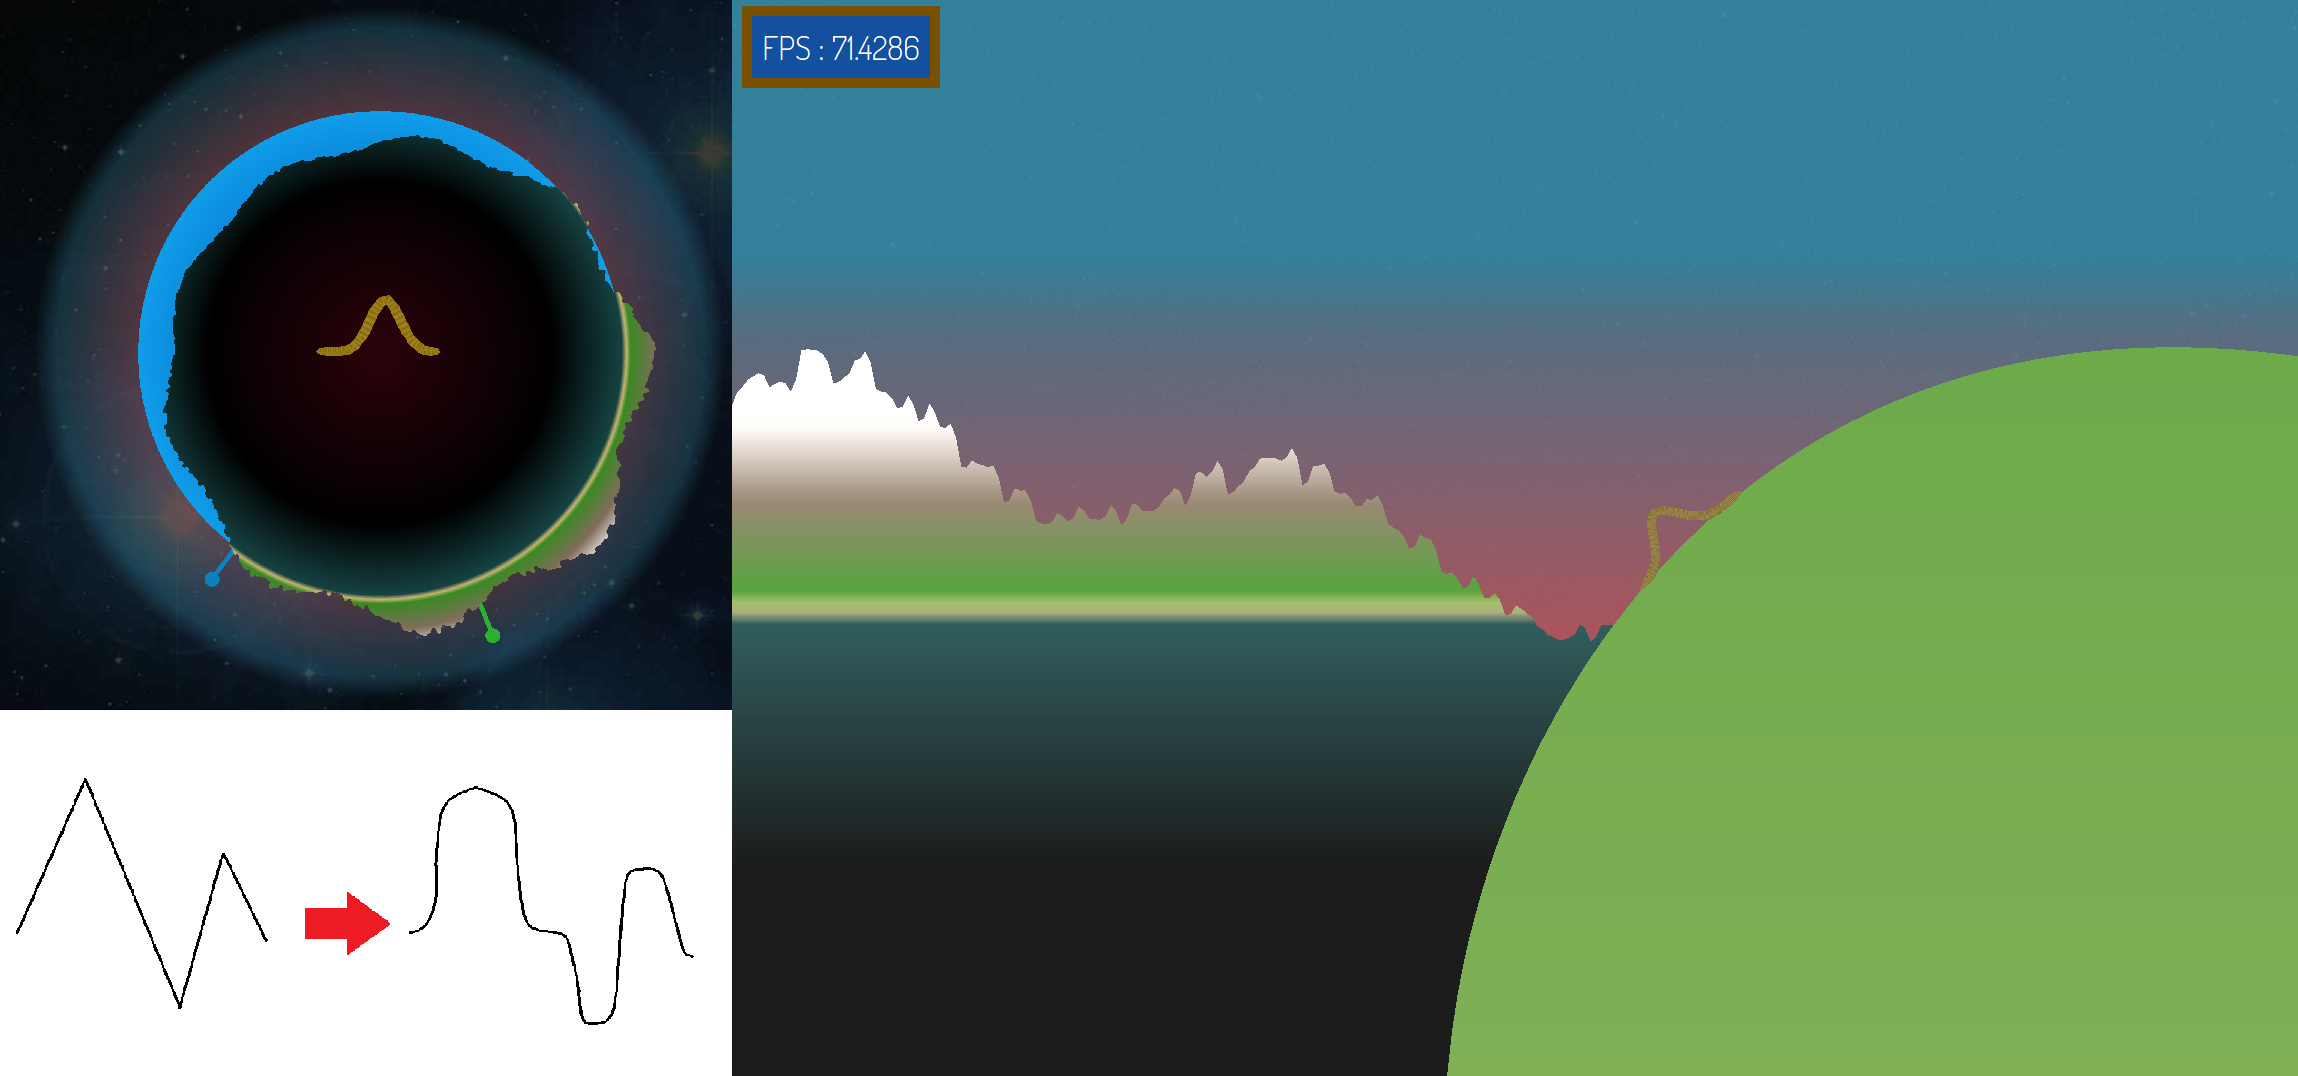
The main thing to understand here is that the terrain isn’t stored as a map, but rather as a few parameters that are passed on to a function dedicated to generating the terrain in real time. The main advantage is that it’s seemless : you can zoom into a portion of terrain forever if you want to ; or zoom out as your microbe turns into a brachiosaurus.
All you need is a class (I called mine World) with two public functions :
  • A function to generate the world for the first time :

void generate(int seed);

  • And a function you can run everytime you need to render or interact with terrain :

double getAltitude(double longitude);

The getAltitude(longitude) function will accept a coordinate in radians passed as an argument, and will return a double that you can then relate to any relevant measuring unit (centimeters, meters, kilometers…). However, it’s important that the longitude (the X coordinate) be expressed in radians (between 0.0 and 2*PI). You’ll find out why.
Your class will also have some private members, all of which (except the random generator itself) will be randomized in the “generate(seed)” function:
  • a RN Generator. I’m using the standard C++ library one :

std::default_random_engine _rNGenerator;

  • an array of floats/doubles to store some random “noise” :

QVector<double> _outline;
(I’m using a custom class that comes with QtCreator but any standard C++ array will do the job).

  • an integer to store the number of hills :

int _nbHills;

  • a float or double to store the maximum altitude :

double _mountainMaxHeight;

  • an integer to adjust the general smoothness of the terrain :

int _smoothness;

  • a couple more double values that will store the coordinates of your “mountains” :
double _mountainOffset1;
double _mountainOffset2;
Now let’s take a look at the first function in world.cpp - the generator/initializer

Step 1.

First, you need to clear up your array of “noise” (in case you’re re-generating an existing instance), seed your generator and set up some random distributions :
void World::generate(int seed){

 _outline.clear();	//Or the standard C++ variant
_rNGenerator.seed(seed);

    //Terrain features

std::uniform_real_distribution<double> terrainOutlineDistribution(0.0, 1.0);
std::uniform_int_distribution<> nbHillDistribution(0, 12);
std::uniform_real_distribution<double> mountainMaxHeightDistribution(MOUNTAIN_MIN_HEIGHT, MOUNTAIN_MAX_HEIGHT); //Set those as #defines
std::uniform_int_distribution<> smoothnessDistribution(MIN_SMOOTHNESS, MAX_SMOOTHNESS);
std::uniform_real_distribution<double> mountainOffsetDistribution(0.0, 2*PI);

Step 2.

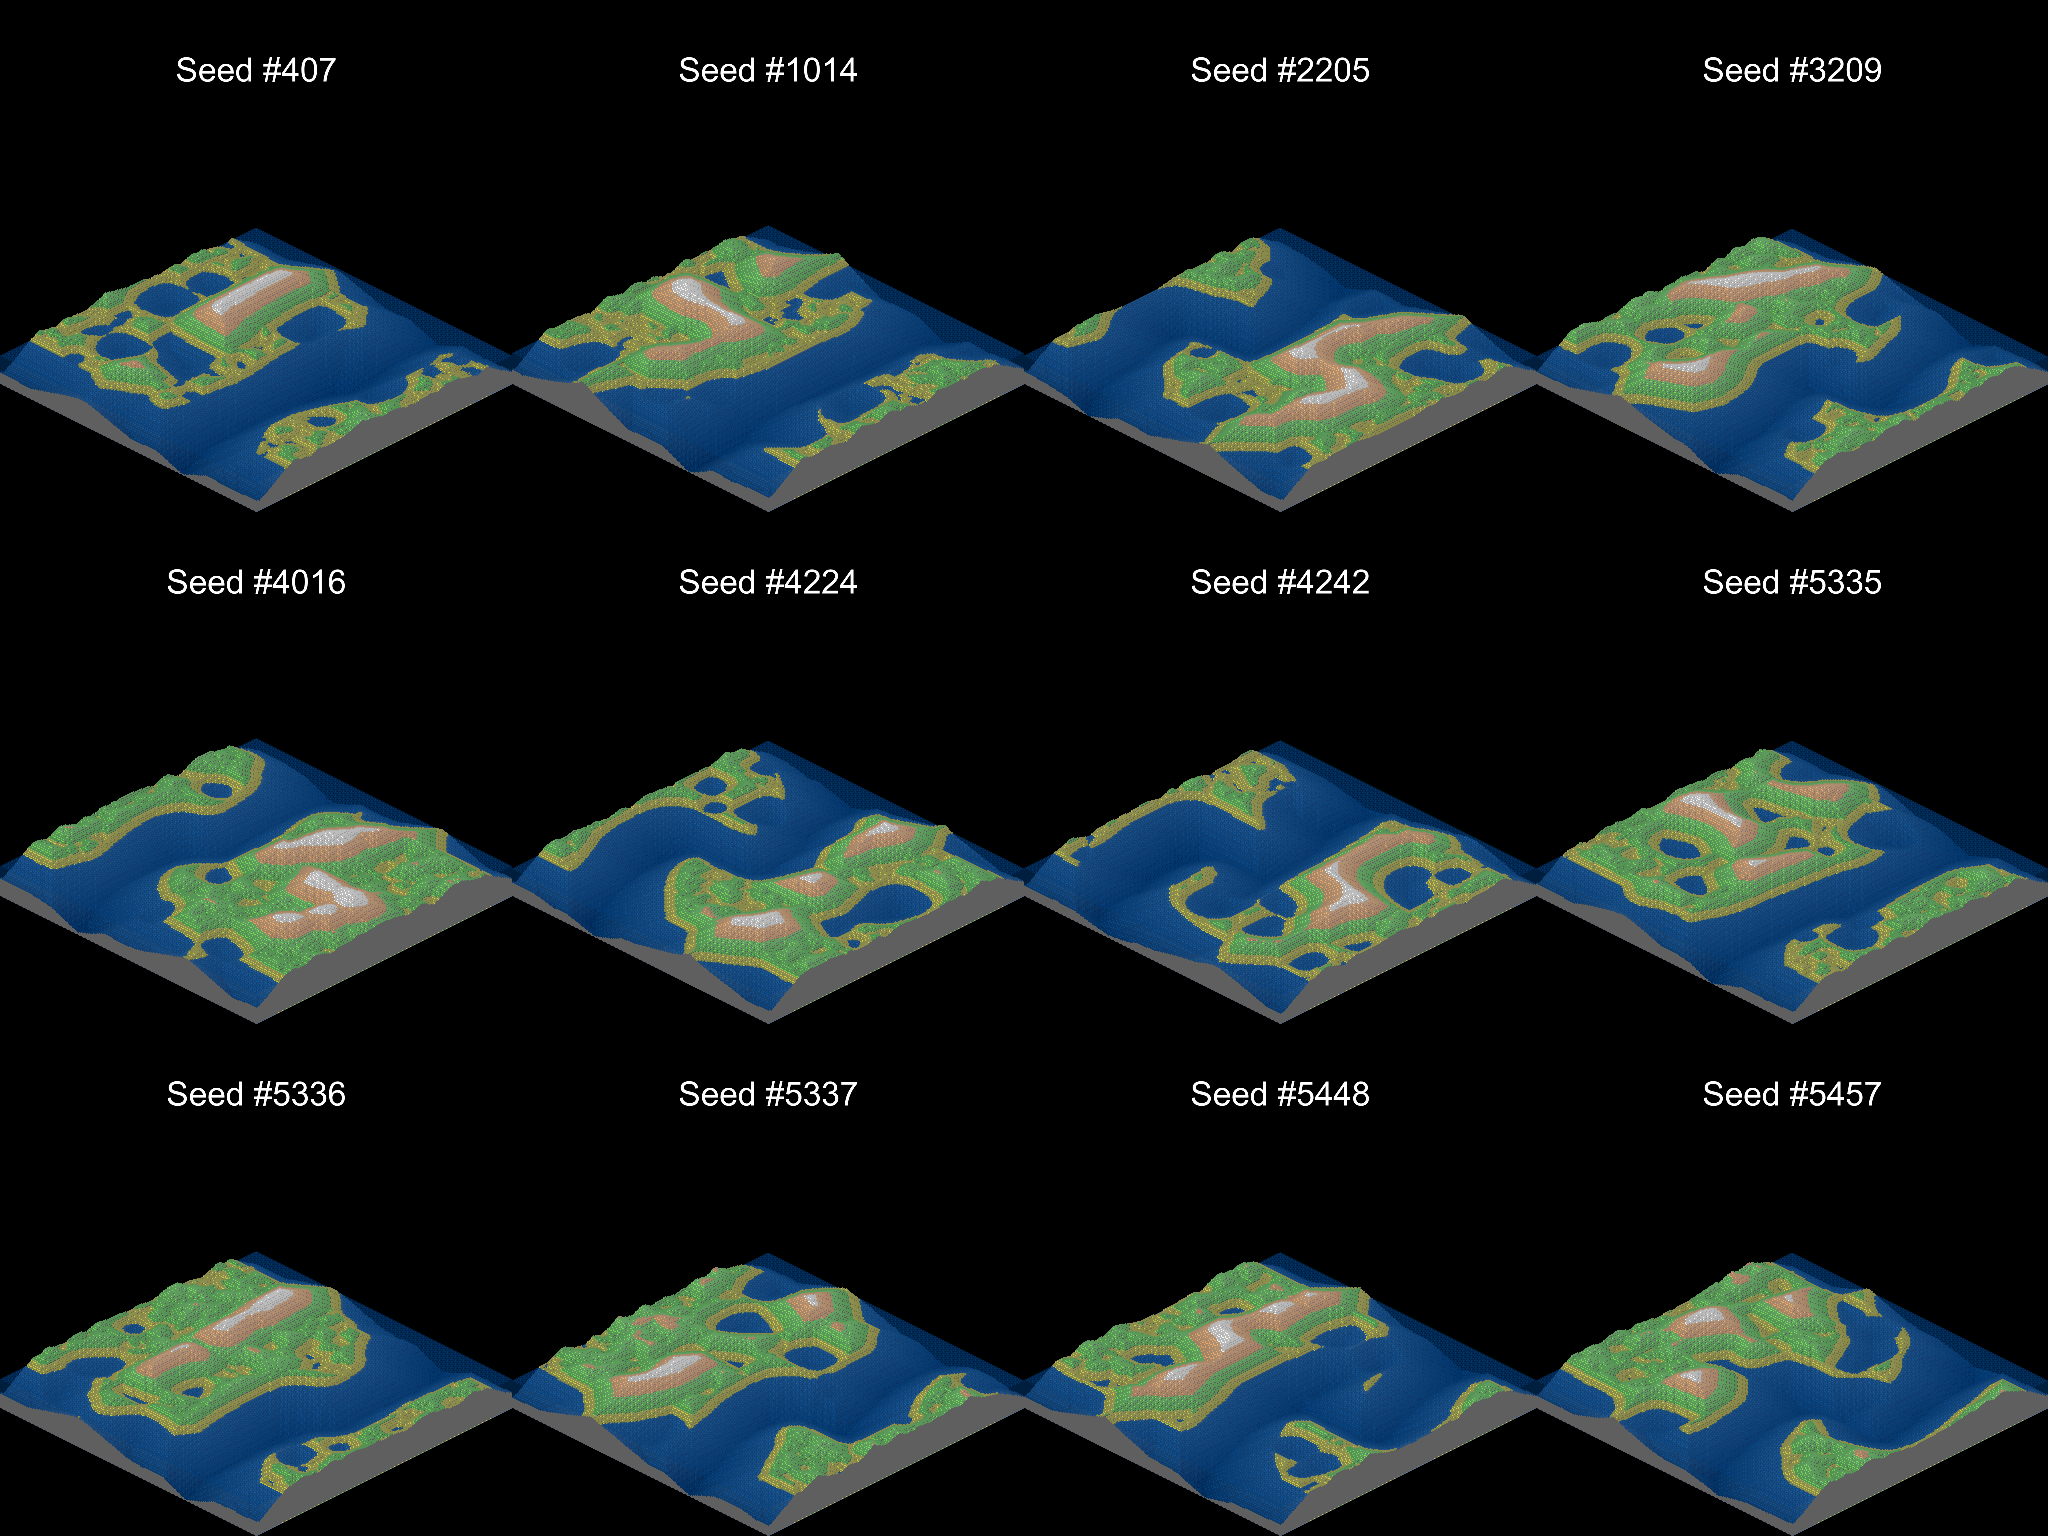
Initialize your members with some random values. So many seeds… so many worlds !
int i;

for(i=0;i<360;i++)
 {
     _outline.push_back(terrainOutlineDistribution(_rNGenerator));	//Or standard C++ variant
}

 _nbHills = nbHillDistribution(_rNGenerator);
 _mountainMaxHeight = mountainMaxHeightDistribution(_rNGenerator);
 _smoothness = smoothnessDistribution(_rNGenerator);
_mountainOffset1 = mountainOffsetDistribution(_rNGenerator);
 _mountainOffset2 = mountainOffsetDistribution(_rNGenerator);

}
That’s it for the first function. Now let’s take a look at the second function - the operational one, used for rendering, collisions, biome detection… and everything else.

Step 3.

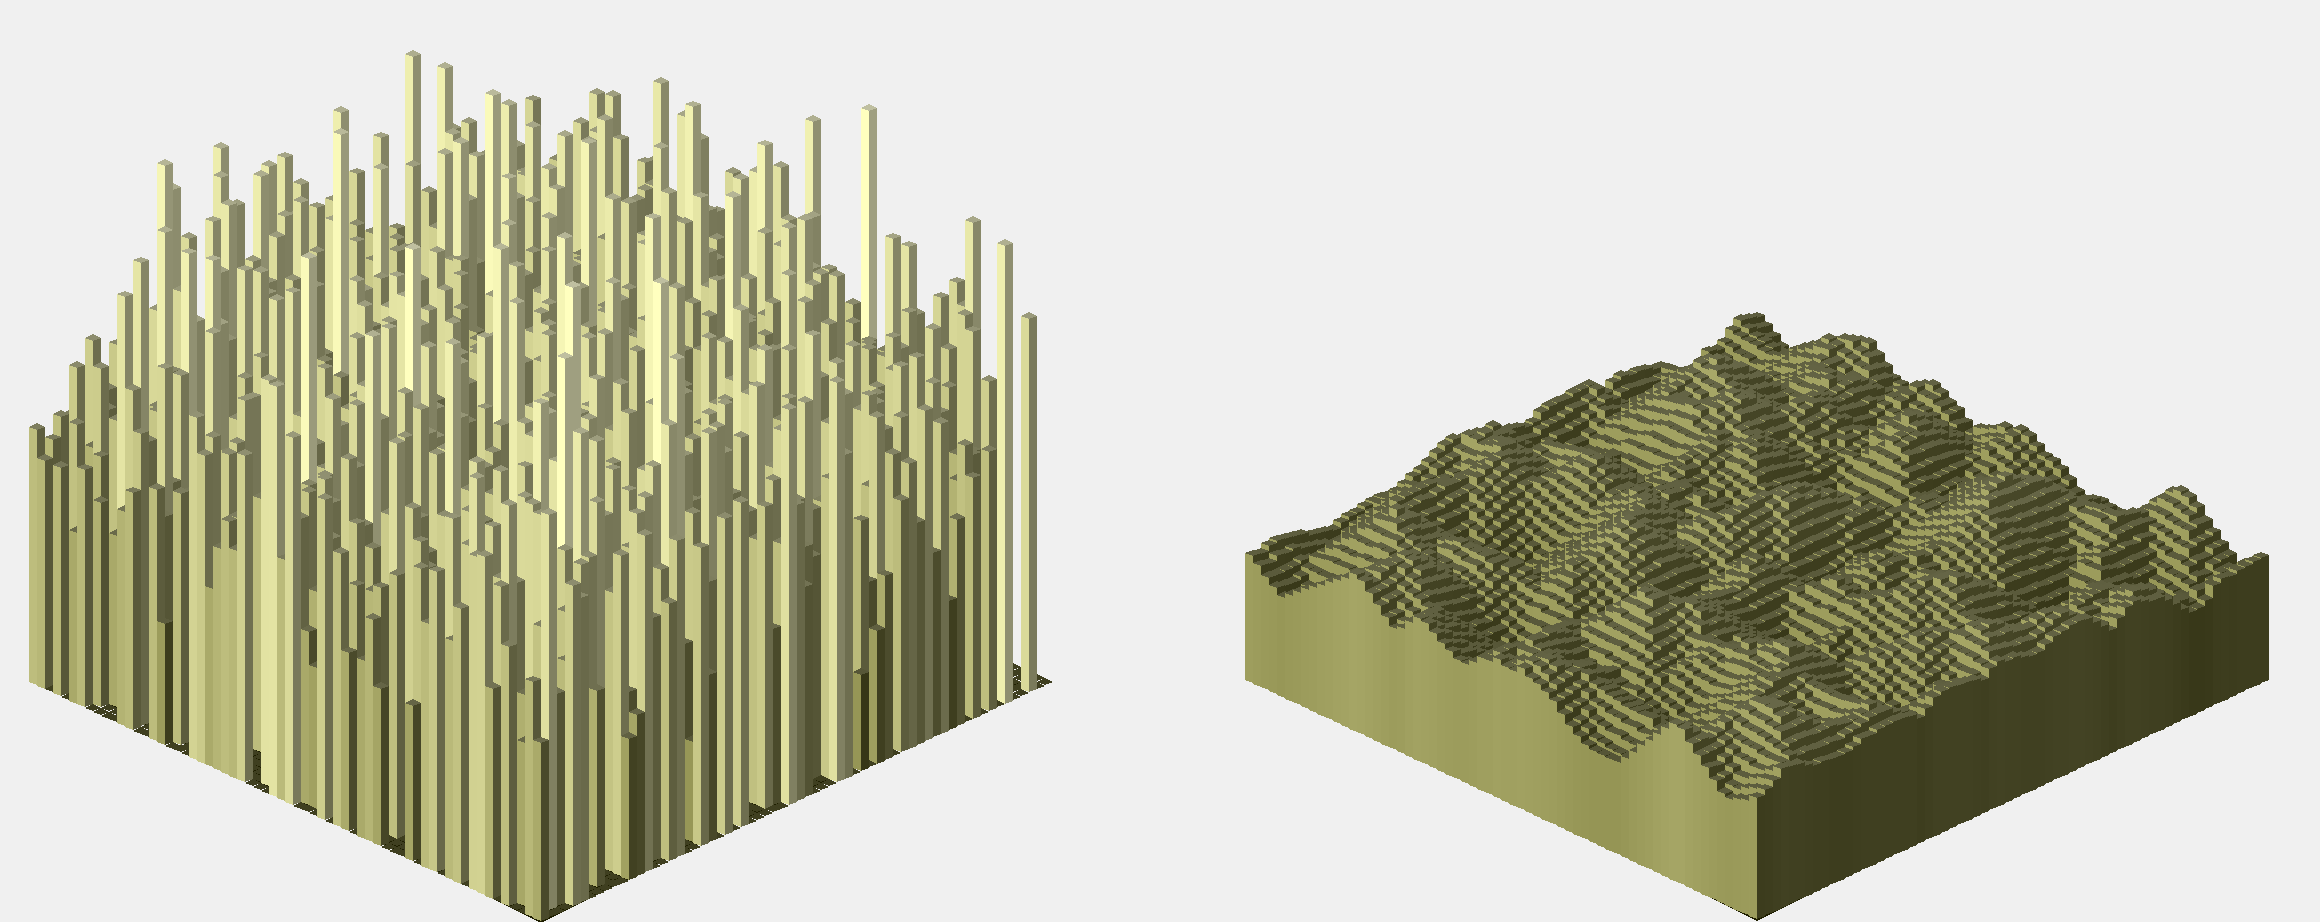
The first half of the function can be very confusing. It’s actually the part that cares about micromanaging your terrain’s curves. Remember the array of “noise” that we filled with values between 0.0 and 1.0 ? We know that the longitude given as an argument can be located somewhere between two of those “dots”.
However, if we consider the slope between two of those “dots” as a straight line, we’ll end up with a landcape that looks like a broken line or polygonal chain (See figure #2). Instead, we want to locate that coordinate on a smooth curve connecting two dots.
Here’s the code for that part of the function. It starts by using a custom function that makes sure the angle given as a parameter falls within [0 ; 2*PI[.

double standardCoordinate(double longitude)

Then it converts the angle to degrees because our array of noise has a size of 360. You can adjust this value to your liking but make sure to change it in the other function as well.

The “double World::standardCoordinate(double angle)” function is an standalone function (I made it static), and goes as follows :
double World::standardCoordinate(double coordinate)
{
    //Converts coordinate in radians to an equivalent value within [0;2*PI[
    double a = coordinate * 1000000;
    double b = (2*PI) * 1000000;
    a = int(a)%int(b);
    b = a/1000000;
    if(b<0.0)
        b = (2*PI)+b;
    return b;
}
And now the plat de résistance, the getAltitude function itself :
double World::getAltitude(double longitude)
{
    //longitude is converted to degrees
double location = (standardCoordinate(longitude)/(2*PI))*360.0; 

double progressOnCurve = location - floor(location);
double minHeightFactor;
double maxHeightFactor;
double heightFactor;

if(floor(location) == 359)     //This is for the last meridian of your world, that needs to be connected to the first
    {
        if(_outline[359]<=_outline[0])  //going uphill
        {
            if(progressOnCurve <= 0.5)  //first half
            {
                maxHeightFactor = (_outline[359]+_outline[0])/2;
                minHeightFactor = _outline[359];
                heightFactor = minHeightFactor + (maxHeightFactor-minHeightFactor)
                        * (1 - (sqrt((1-(2*progressOnCurve))) + (1 - sqrt((1-(2*progressOnCurve)))) * (1-(2*progressOnCurve))));

            }
            else                        //second half
            {
                maxHeightFactor = _outline[0];
                minHeightFactor = (_outline[359]+_outline[0])/2;
                heightFactor = minHeightFactor + (maxHeightFactor-minHeightFactor)
                        *(sqrt(2*(progressOnCurve-0.5)) + (1 - sqrt(2*(progressOnCurve-0.5))) * (2*(progressOnCurve-0.5)));
            }
        }
        else                            //going downhill
        {
            if(progressOnCurve <= 0.5)  //first half
            {
                maxHeightFactor = _outline[359];
                minHeightFactor = (_outline[359]+_outline[0])/2;
                heightFactor = minHeightFactor + (maxHeightFactor-minHeightFactor)
                        * (sqrt(1-(2*progressOnCurve)) + (1 - sqrt(1-(2*progressOnCurve))) * (1-(2*progressOnCurve)));
            }
            else                        //second half
            {
                maxHeightFactor = (_outline[359]+_outline[0])/2;
                minHeightFactor = _outline[0];
                heightFactor = minHeightFactor + (maxHeightFactor-minHeightFactor)
                        * (1 - (sqrt(2*(progressOnCurve-0.5)) + (1 - sqrt(2*(progressOnCurve-0.5))) * (2*(progressOnCurve-0.5))));
            }
        }
    }
    else
    {
        if(_outline[floor(location)]<=_outline[floor(location)+1])  //going uphill
        {
            if(progressOnCurve <= 0.5)  //first half
            {
                maxHeightFactor = (_outline[floor(location)]+_outline[floor(location)+1])/2;
                minHeightFactor = _outline[floor(location)];
                heightFactor = minHeightFactor + (maxHeightFactor-minHeightFactor)
                        * (1 - (sqrt((1-(2*progressOnCurve))) + (1 - sqrt((1-(2*progressOnCurve)))) * (1-(2*progressOnCurve))));
            }
            else                        //second half
            {
                maxHeightFactor = _outline[floor(location)+1];
                minHeightFactor = (_outline[floor(location)]+_outline[floor(location)+1])/2;
                heightFactor = minHeightFactor + (maxHeightFactor-minHeightFactor)
                        *(sqrt(2*(progressOnCurve-0.5)) + (1 - sqrt(2*(progressOnCurve-0.5))) * (2*(progressOnCurve-0.5)));
            }
        }
        else                            //going downhill
        {
            if(progressOnCurve <= 0.5)  //first half
            {
                maxHeightFactor = _outline[floor(location)];
                minHeightFactor = (_outline[floor(location)]+_outline[floor(location)+1])/2;
                heightFactor = minHeightFactor + (maxHeightFactor-minHeightFactor)
                        * (sqrt(1-(2*progressOnCurve)) + (1 - sqrt(1-(2*progressOnCurve))) * (1-(2*progressOnCurve)));
            }
            else                        //second half
            {
                maxHeightFactor = (_outline[floor(location)]+_outline[floor(location)+1])/2;
                minHeightFactor = _outline[floor(location)+1];
                heightFactor = minHeightFactor + (maxHeightFactor-minHeightFactor)
                        * (1 - (sqrt(2*(progressOnCurve-0.5)) + (1 - sqrt(2*(progressOnCurve-0.5))) * (2*(progressOnCurve-0.5))));
            }
        }
    }

Step 4.

The last part of the function is much shorter than the first one. In the previous stage, the function has left you with a “heightFactor” value which falls between 0.0 and 1.0. It has made sure that two longitudes that are close to each other will also return two altitudes which are close to each other, connected with a nice, smooth slope. You could stop here and have the function return the “heightFactor” value. It will work, but will look like a very dramatic landscape. So what we need now are some mitigating factors that will be used as “filters” to add variety and a natural feel to our terrain.

For stability, I only choose factors (values that we will multiply our “heightFactor” with) between 0.0 and 1.0. This is to guarantee that our final result also stands between 0.0 and 1.0.

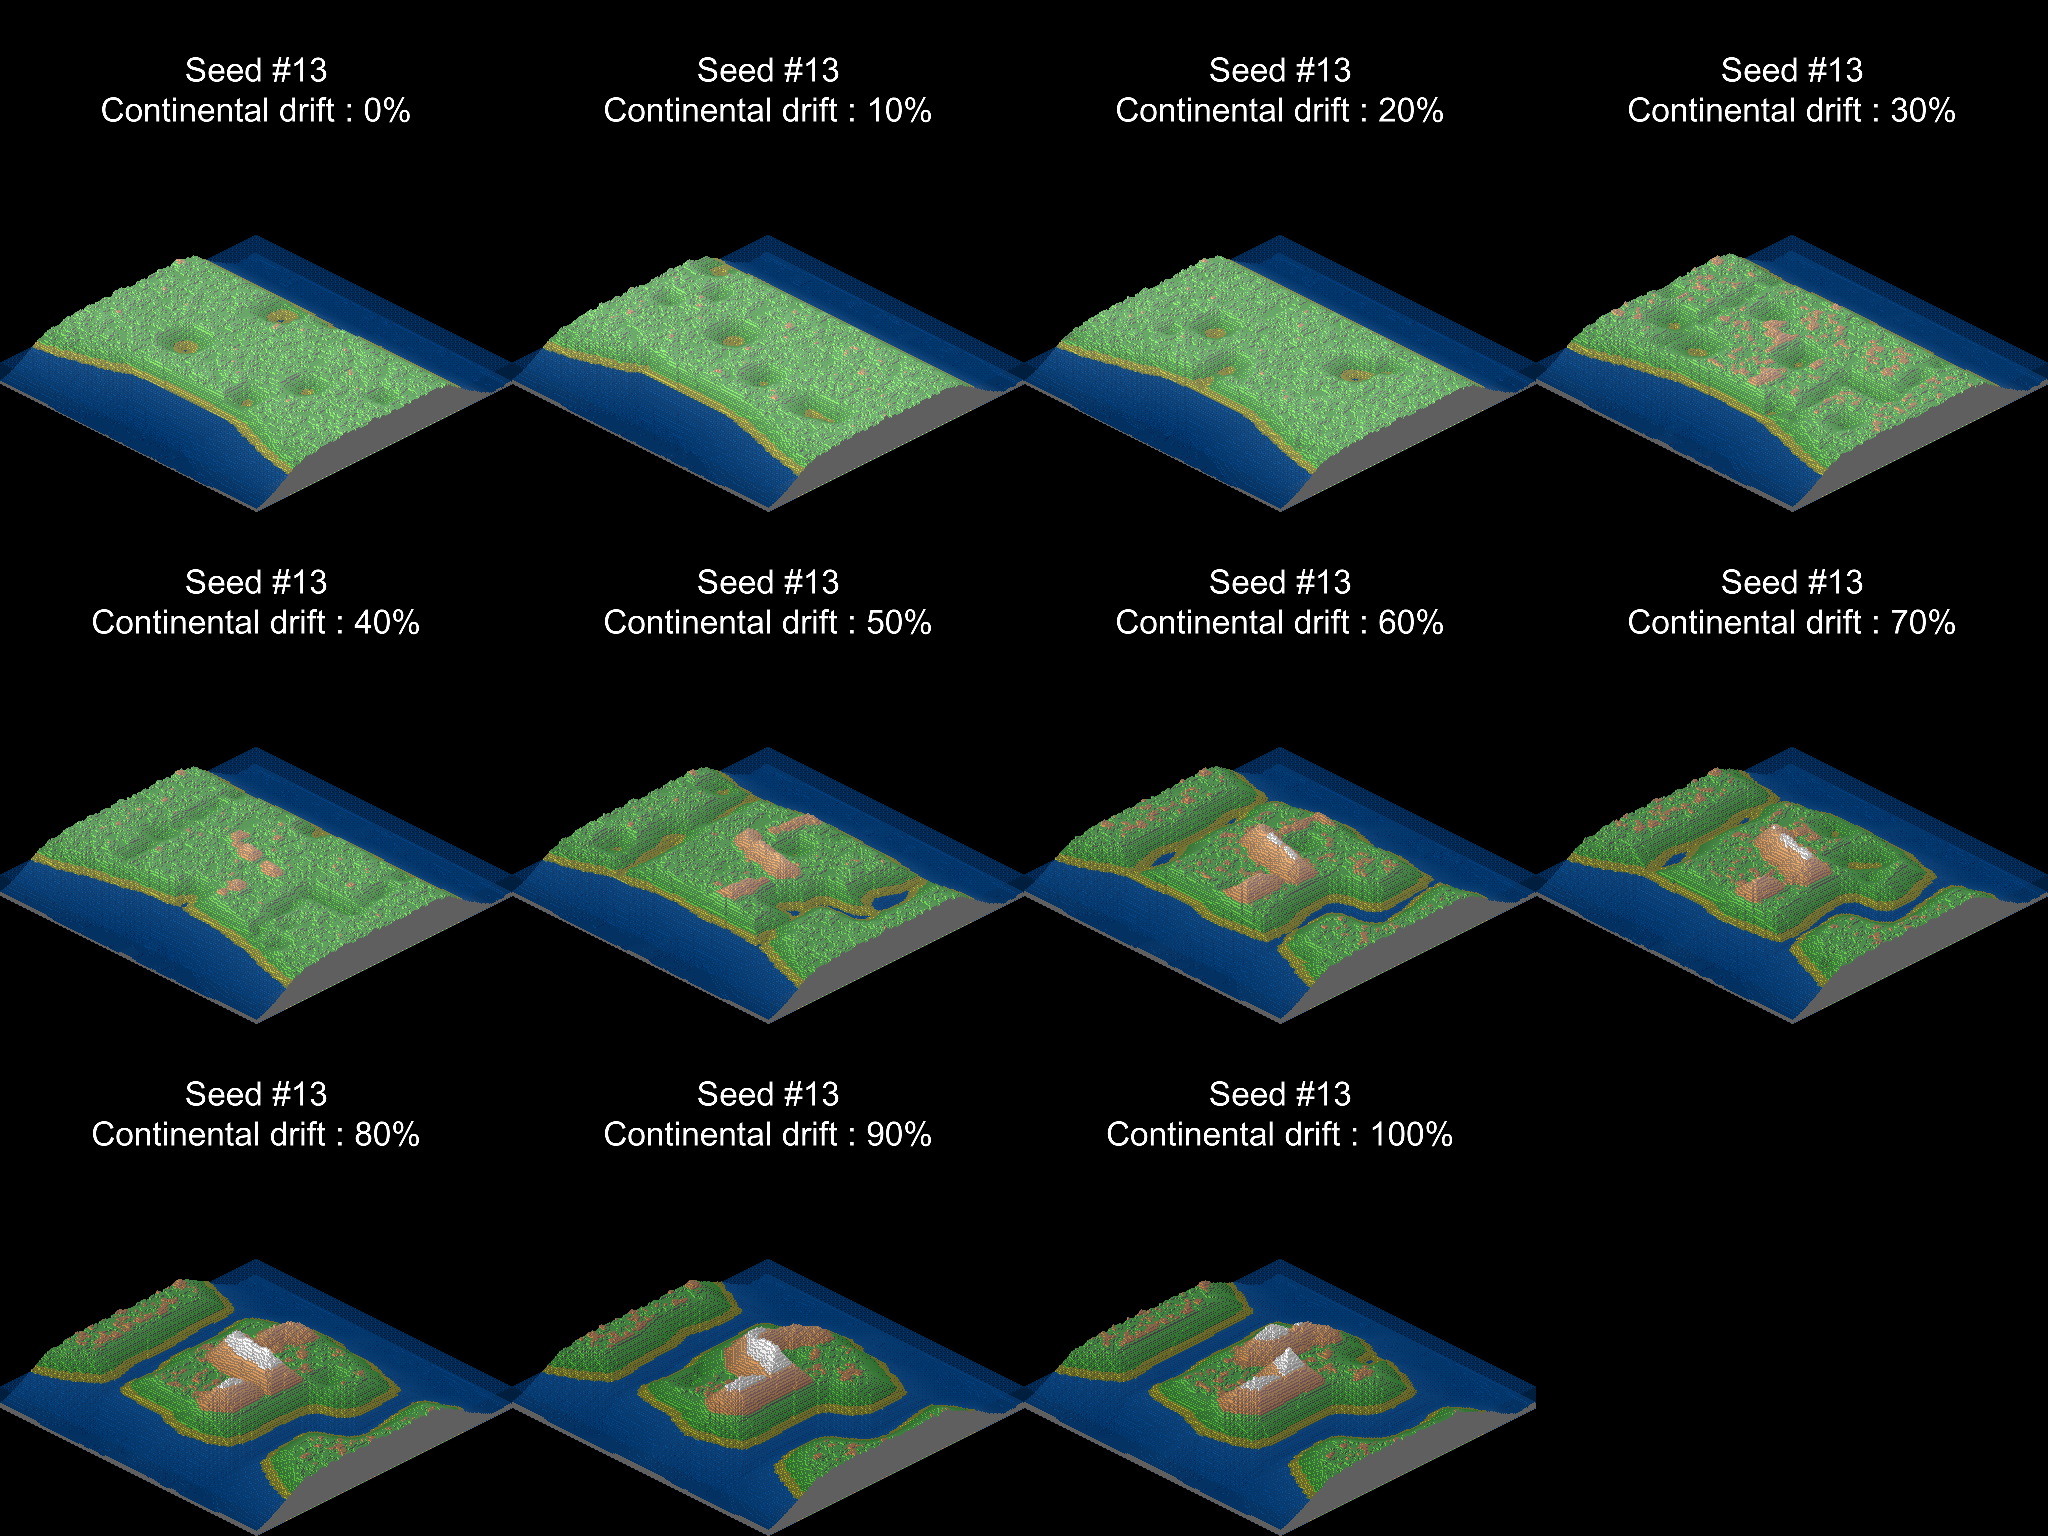
Hills and mountains are best simulated using the cosinus and sinus functions. This is also why I chose to express the X coordinate as an angle in radians in the first place. Here I won’t go too far into the details. You can see I used several “layers” of terrain manipulation. This is highly customisable as long as you design microfunctions in the [0.0 ; 1.0[ range. Be aware, however, that the more you stack em, the lower you terrain will be (0.5 times 0.5 times 0.5… tends towards 0.0).

Finally, you just need to multiply that [0.0 ; 1.0] value by whatever the maximum height or base unit is in your world : height of the screen (in pixels), of the terrarium, of the atmosphere, etc…
double smoothness = _smoothness;

    return (heightFactor/smoothness+((smoothness-1)/smoothness))
            *((cos(longitude*_nbHills)+1)/8+0.75)
            *((cos(longitude-_mountainOffset1)+1)/4+0.5)
            *((cos(longitude-_mountainOffset2)+1)/4+0.5)
            *_mountainMaxHeight;
}
As far as rendering is concerned, adapting this to your graphic engine should not be too big of a challenge. It’s pretty straightforward. In the first picture I posted - the planet editor, altitude is added to the radius of a circle. That circle is then translated into a series of points, passed on to the rasterizer. In the next example, altitude dictates the Y coordinate of the points in the terrain outline.
In the picture I posted you have noticed that the terrain has water, grass and snowy tops. This has been achieved by stating key altitudes as #defines in the world class header file. In my configuration, for example, sea level is 1000 meters high. Tundra is 1500 meters high. I find it easier not to mix this aspect with the shape of the terrain itself. Using #defines also allows for later rescaling through trial and error
I’de be happy to give more details if that contributes to the advancement of the game. Also, you might have some ideas regarding land generation in Thrive, or bits of code to share. This can be discussed here I suppose, if there is not yet a dedicated topic.
8 Likes

Welcome to the forums! @Anukid

I don’t want to shoot you down, and i know nothing about code, but thrive uses C#. We recently switched. But other than that, this looks really good!

Algorithms are not programming language specific (unless it is something like Haskell…)

Anyway, after a quick look, this looks a pretty good walkthrough of how do do procedural terrain. But for thrive, I think, we’ll want, way, way more complex generation that would generate realistic 3D planets with varying detail levels for also being useful in the space stage. And that’s just the inorganic part, the planets in Thrive will need to also be affected by things like plant species spreading around.

1 Like

Welcome to the Community forums @Anukid ! :+1:

Correct me if I’m wrong, but isn’t the Spore Planet Generator in the game files (of spore)? So would it be possible to find the ‘pollution’ file that generates plants and creatures?

I’m almost 100% certain that the spore code, including the planet generation, is not included in the final game. Meaning that a compiled version of the code is distributed, like with most games. And for building on top, compiled code is basically useless.
Even if it wasn’t, it would be highly, highly illegal to steal their intellectual property for our uses.

1 Like
Hi,
Thanks for your feedback and welcoming words.
I agree that taking code from another game is not a good idea. Also, it probably wouldn’t be tailored to this game’s particular needs.
From what I understood, the pollution map is something that is fed to the procedural engine to help with number and curve generation. Even if someone did get to see it, I doubt it can teach you how the engine or algorithm works.
Edit : some game designers also use heightmaps. It’s basically a grey scale image that simulates the terrain. Every pixel on the image is converted to a vertex. The brighter the pixel, the higher the Z coordinate will be. 0 stands for ground level or below sea level and white stands for high altitude. If you want to procedurally generate a 3D planet, one lightweight option would be to generate the heightmap in 2D, then pass it on to the 3D rendering functions. You could always wrap it around the shape of a sphere by converting X, Y and Z to polar coordinates.
Today I tried something a little bit different to generate terrain. It does so by simulating natural erosion. To the left is a visual representation of an array of random integers. I only filled half of the array with random numbers with some empty gaps in between. To the right is what it becomes after I apply gravity. Every grain of sand checks if it can fall on its neighbours.
Unlike what I showed earlier the values are stored in an array so it’s not seamless.
At the moment it’s quite resource hungry and needs optimization. I couldn’t be bothered to set up an OpenGL engine just to show you this so here’s an isometric view. I think it’s enough to get the idea. Just mentally replace the tiles with vertices and polygons.

If you want to know more about the algorithm I used I’d be happy to share.
3 Likes
Is there any process that is like “reverse compiling”? To find the programs of a software that has only compiled files?

But the results are often (if not most of the time) not great, because when compiling things like variable names are lost, as well as comments, which are very important for understanding the code. Also the split into files is lost. Compiling throws away a ton of information that is useful in understanding how the software works as well as how to nicely do further development without breaking it entirely. That’s why reverse engineering a compiled executable is a ton of work. As such most of the time, if you know what the software is supposed to do, it is much faster to code it from scratch. Hell, even sometimes when you do have the source code it is such a mess that the best option is to rewrite the software from scratch, even though you have access to the source code.

I guess SR1 will never get a remake then.

I’ve heard that the recent crash bandicoot remaster was recoded from scratch.
Wikipedia seems to at least partly agree that the existing source code couldn’t be used:

But it definitely was way more work to remaster the games without the source code. And I remember reading that some people were pretty unhappy that the movement in the remastered version felt slightly different compared to the original, which is a likely result of having to recode the game.

1 Like

My question stemmed from curiosity, along with a lack of knowledge on how games handle their code, thanks for the response.

2 Likes

Hi.

I managed to refine and optimize the erosion algorithm to the point where I can generate 192*192 maps in seconds.

I think this method would produce the most realistic 3D terrain.
Look at those sand dunes.

And I mean, this is only from feeding the algorithm an array of random spikes. Imagine using a combination of traditional heightmaping with this on top. With the 2D heightmap generator algorithm you can get bold : strike your canvas with large strokes and scars where mountains and rifts are. Or shower it with craters of different sizes. Then use the erosion algorithm to smooth things out and make it look realistic.

The last step would be wrapping your array into a sphere. Which takes some mathematic brain to do, but you can always cheat around and make it into a torus instead (i.e. donut-shaped, connecting the southern border with the northern border and the eastern border with the western border separately).
Later on I’ll implement a 2D heightmap generator before the erosion algorithm is triggered to show you what I mean.
5 Likes

Hi.

Here’s a little update with my terrain generator. As for now it’s an independent program so I won’t be programming that into Thrive yet. I would need to learn how to work with Godot first. But in the future, what you see below could be ported to their engine if requested.

This is as much variety as I can get with the current implemented functions. All worlds spawn with one rift and one mountain range aligned along the N-S axis. Sometimes the rift is to the west, sometimes it is to the east. They can also partly overlap. However I chose not to make them perpendicular because I think that’s not how it works in real life ? Please help with geology here if you know something useful.

The sharp eye will also have noticed something weird going on at the poles. Realistically the altitude at the poles should be the same along the whole northern or southern border because that’s where all the meridians meet. I will fix that soon.

The worlds could also be given a little bit more variety by adjusting the sea level (on the pictures above, it’s always set at 55% of the maximum detected altitude)

However at the moment I’m focusing mostly on plate tectonics. The good news here is that, for a given world that you’ve already generated, you can always come back later an ask for the same map at a different era : it will adjust the width of the rift and moutain range accordingly, thus producing the illusion that the continents have drifted. I think this is a feature that a few people want so I’m keeping that in mind.

On the downside the program has at least two weaknesses : it can only generate a 192*192 array of heigths, and it needs more optimisation to run quicker. So it still needs a bit of work !

3 Likes

Hi.

I fixed the poles and added some very basic continental drift simulation :

2 Likes

This won’t be used in Thrive unless you can make it spherical, the size of a planet, and simulated over millions of years. The terrain should not merely be procedural, but rather created via simulated geologic processes. Plate tectonics, orogeny, wind patterns, precipitation, altitude, and solar radiation are among the many things that Thrive’s worlds will hopefully simulate. As such, the generator you have presented thus far does not suit Thrive’s vision at the moment.

Since Thrive’s worlds will be separated into “patches”, you could help by trying to designate these separations in your generator. You can read the developer forum to see that there is uncertainty about how the delineations should be made. For example, the size of the bathypelagic patch is uncertain. Should every area of ocean with a certain depth be put in the same patch? That would mean that very distant areas with incidentally similar depths would be put together, which is not accurate. I think solutions to this problem could be tested in your current generator, which would help the developers.

1 Like

Hi,

First, thank you for reminding me I’m not a triple-A game programmer. I appreciate your support and guidance towards setting achievable goals.

You’re right, at this stage this generator cannot pretend to fit all of Thrive’s ambitions .

Also, I 'm not making a world generator for Thrive. I’m working on one aspect of world generation at a time. My current goal was to achieve some sort of basic plate tectonics simulation. Which I did on my spare time as a hobby, to keep this community’s dreams alive.

Even though, what this generator produces can still be passed on to a 3D engine and set of functions to make it spherical. Nothing stops anybody from programming the next program that will do it, to step even further towards a finished game.

Actually most 3D game designers know that 2D heightmaps are a traditionnal prerequisite in the making of 3D game environments. I’m surprised you’re acting as if this was supposed to look like the final product.

Surely more than one person can work together to achieve this ?

The vision and ambition you’re presenting in your response can inspire people and make them dream big.
But remember you’re relying on a community of people working for free on their spare time. Some of them are teenagers learning code for the first time. Some of them are middle-aged people doing a little bit of coding on the side. Get them to work together as a team on small bits and they’ll work wonders.

Your suggestion of helping with the patches makes more sense to me than your first paragraph, which is just putting me down for no good reason. I’ll have a look at the developer forum.

5 Likes

I’m uncertain why you understood my response as an insult. Why would I insult you for no reason? You wrote “As for now it’s an independent program so I won’t be programming that into Thrive yet”, thereby showing that you intend to program this into Thrive. I was responding to that intention by stating that it would not happen unless the generator matched Thrive’s plan. I never suggested that your project was supposed to look like a final product.

Anyway, here is a link to the thread on the developer forum I mentioned. You can see the posts toward the bottom by Narotiza (particularly the one from 8 February) which elucidate the problem with patches. https://forum.revolutionarygamesstudio.com/t/patch-map-design-discussion/597/111

2 Likes